前后端分离项目最痛苦的就是编写接口文档了,一大堆的请求参数和响应参数需要填写。此外如果接口文档在项目刚开始就编写,后期实际编写代码需要改动的地方也会比较多,这样又需要改动接口文档并发给前端,十分的不智能。 直到我看到Swagger插件,可以直接扫描Controller层的接口,并且可以自动读取请求参数和响应参数,并且可以通过注解设置备注和示例值。简直又是一个造福懒人的伟大插件。
Swagger2
引入依赖
1
2
3
4
5
6
7
8
9
10
<dependency>
    <groupId>io.springfox</groupId>
    <artifactId>springfox-swagger2</artifactId>
    <version>2.9.2</version>
</dependency>
<dependency>
    <groupId>io.springfox</groupId>
    <artifactId>springfox-swagger-ui</artifactId>
    <version>2.9.2</version>
</dependency>
配置类
1
2
3
4
5
6
7
8
9
10
11
12
13
14
15
16
17
18
19
20
21
22
23
24
25
26
27
28
@EnableSwagger2
@Configuration
public class Swagger2Config {
    @Bean
    public Docket createRestApi() {
        return new Docket(DocumentationType.SWAGGER_2)
             .apiInfo(apiInfo())
             .select()
             //为当前包路径,控制器类包
             .apis(RequestHandlerSelectors.basePackage("com.xxx.xxx.controller"))
            .paths(PathSelectors.any())
             .build();
    }
    //构建 api文档的详细信息函数
    private ApiInfo apiInfo() {
        return new ApiInfoBuilder()
            //页面标题
           .title("XX平台API接口文档")
            //创建人
           .contact(new Contact("YoungSheep", "https://youngsheep.fun",
                 "568462483@qq.com"))
           //版本号
          .version("1.0")
           //描述
          .description("描述")
          .build();
    }
}
根据网上的教程这样配置后访问http://localhost:port/swagger-ui.html 便能看到接口文档了。 但我访问却显示404 Not Found 后来查询资料才知道这个swagger-ui.html相关的所有前端静态文件都在springfox-swagger-ui的jar包里面,需要在WebMvcConfig 类中添加路径映射。
1
2
3
4
5
6
7
8
9
10
11
12
@Configuration
public class WebMvcConfig extends WebMvcConfigurerAdapter {
    @Override
    public void addResourceHandlers(ResourceHandlerRegistry registry) {

        registry.addResourceHandler("swagger-ui.html")
            .addResourceLocations("classpath:/META-INF/resources/");

        registry.addResourceHandler("/webjars/**")
            .addResourceLocations("classpath:/META-INF/resources/webjars/");
    }
}
这样便能顺利的打开http://localhost:项目port/swagger-ui.html 查看接口信息了。
使用注解完善接口文档信息
如果不用注解给接口以及Model对象设置一些备注,那这个接口文档的可读性将会很差,因此需要在项目中通过注解完善接口文档的信息,很显然这样做说明Swagger具有代码入侵性,但都用了懒人插件了,谁还管那么多呢😊。
| 注解 | 使用位置 | 作用 |
|---|---|---|
| @Api | 用于controller类上 | 定义接口的名程以及标签 |
| @ApiOperation | 用于controller方法上 | 定义接口描述 |
| @ApiParam | Controller 方法的参数上 | 定义参数的描述 |
| @ApiIgnore | 用于controller方法上 | 可以让Swagger忽略这个接口,不显示在接口文档中 |
| @ApiModel | 数据传输对象(DTO)类上 | 定义参数对象的名称 |
| @ApiModelProperty | 数据传输对象(DTO)类的属性上 | 定义具体参数的描述 |
注解使用实例:
- Controller类
1
2
3
4
5
6
7
8
9
10
11
12
13
14
  @Api(tags = "Hello控制类")
  @RestController
  public class HelloController {
      @ApiOperation("获取用户信息")
      @GetMapping(value = "/user")
      public User getUser(){
          return new User("admin","123456");
      }
      @ApiOperation("传入用户名")
      @PostMapping("/param")
      public String hello2(@ApiParam("用户名") String username){
          return "hello" + username;
      }
  }
- DTO类
1
2
3
4
5
6
7
8
  @Data
  @ApiModel("用户")
  public class User {
      @ApiModelProperty(value = "用户名",example = "admin")
      private String username;
      @ApiModelProperty(value = "密码",example = "admin")
      private String password;
  }
这样就可以在Swagger接口网页上看到Hello控制类下获取用户信息、传入用户名两个接口的详细信息,包括传入参数以及返回参数的详细信息。
实现统一返回类的配置
在实际的项目中很可能定义了统一返回类型,例如:
1
2
3
4
5
6
7
8
9
10
11
12
13
14
15
16
17
18
19
20
21
22
23
24
25
26
27
28
29
@Data
public class CommonReturnType {

  public static final String STATUS_SUCCESS = "success";
  public static final String STATUS_FAIL = "fail";


  /**
   * 表明对应请求的处理结果是"success"或者"fail"
   * 若status=success,则返回前端需要的json数据
   * 若status=fail,则data内使用通用的错误码格式
   */
  @ApiModelProperty(value = "返回处理结果",example = "success/fail")
  private String status;

  @ApiModelProperty(value = "返回处理结果数据")
  private Object data;

  public static CommonReturnType create(String status,Object result){
      CommonReturnType type = new CommonReturnType();
      type.setStatus(status);
      type.setData(result);
      return type;
  }

  public static CommonReturnType create(Object result){
      return CommonReturnType.create(CommonReturnType.STATUS_SUCCESS,result);
  }
}
这样之前的controller类就需要该成这样:
1
2
3
4
5
6
7
8
9
10
11
12
13
14
@Api(tags = "Hello控制类")
@RestController
public class HelloController {
  @ApiOperation("获取用户信息")
  @GetMapping(value = "/user")
  public CommonReturnType getUser(){
      return CommonReturnType.create(new User("admin","123456"));
  }
  @ApiOperation("传入用户名")
  @PostMapping("/param")
  public CommonReturnType hello2(@ApiParam("用户名") String username){
      return CommonReturnType.create("hello" + username);
  }
}
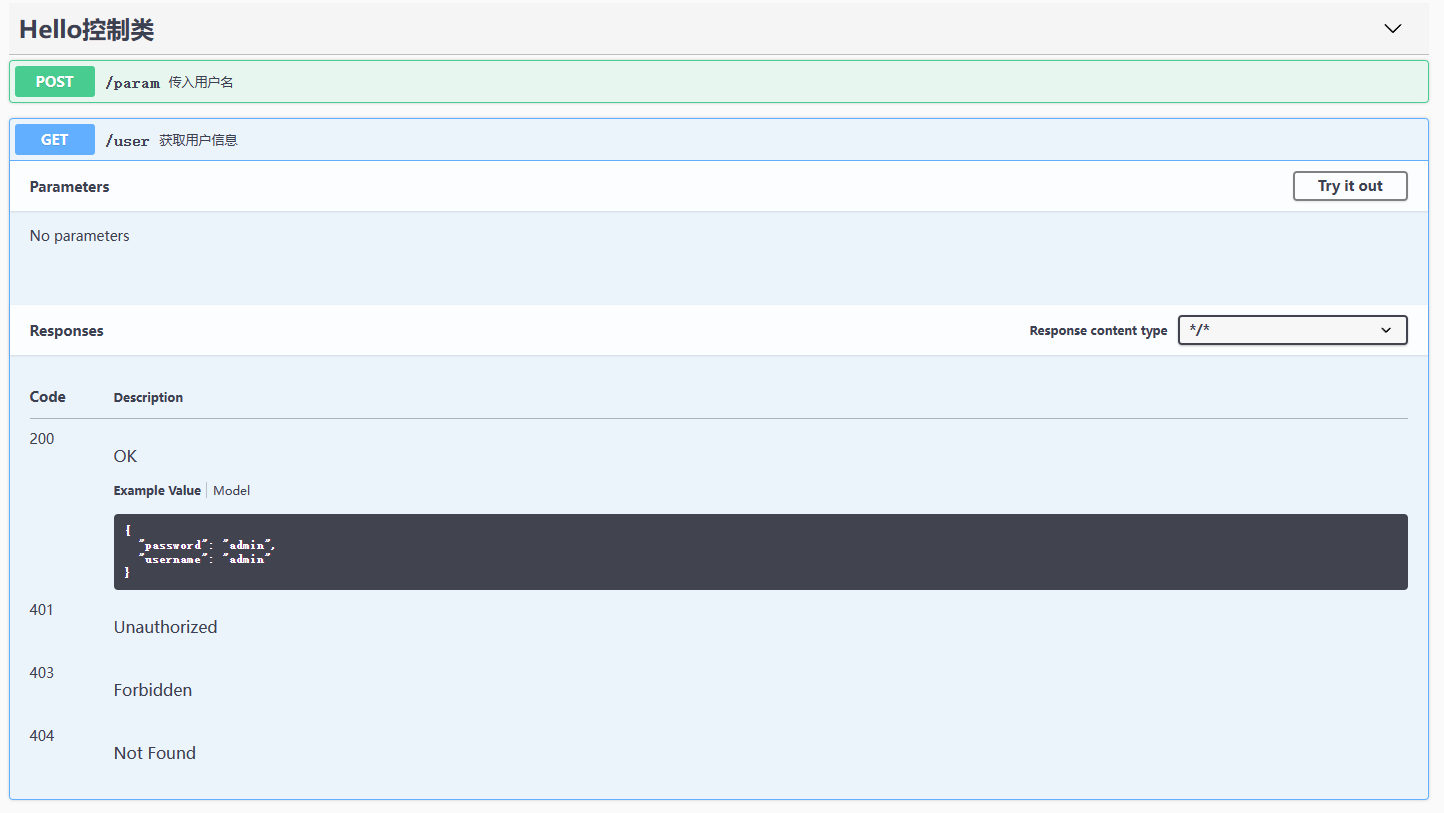
这更符合实际项目需要,但使用Swagger生成接口文档则会引发一个问题,就是无法获取通用返回类的数据类型,实际显示效果如下:
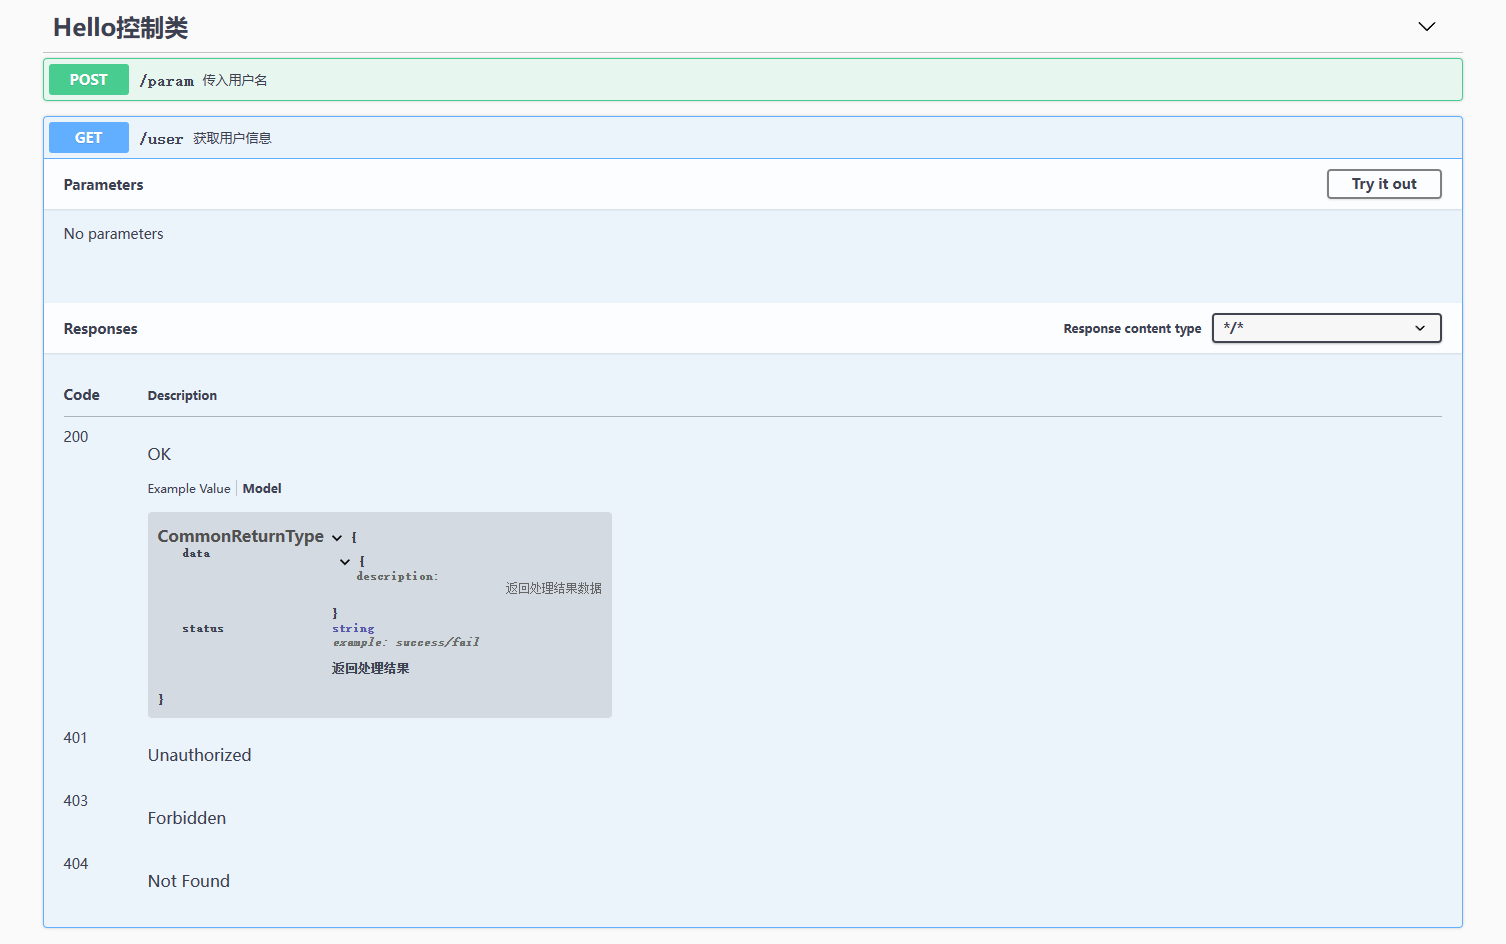 为了让Swagger获取到通用返回类的data属性的对象,就需要使用泛型定义通用返回类,并在controller层方法中传入返回类的data属性的类型。例如:
使用泛型的通用返回类:
为了让Swagger获取到通用返回类的data属性的对象,就需要使用泛型定义通用返回类,并在controller层方法中传入返回类的data属性的类型。例如:
使用泛型的通用返回类:
1
2
3
4
5
6
7
8
9
10
11
12
13
14
15
16
17
18
19
20
21
22
23
24
25
26
27
28
@Data
public class CommonReturnType<T> {

	public static final String STATUS_SUCCESS = "success";
	public static final String STATUS_FAIL = "fail";
    /**
     * 表明对应请求的处理结果是"success"或者"fail"
     * 若status=success,则返回前端需要的json数据
     * 若status=fail,则data内使用通用的错误码格式
     */
    @ApiModelProperty(value = "返回处理结果",example = "success/fail")
    private String status;


    @ApiModelProperty(value = "返回处理结果数据")
    private T data;

    public static <T> CommonReturnType<T> create(String status,T result){
        CommonReturnType<T> type = new CommonReturnType<>();
        type.setStatus(status);
        type.setData(result);
        return type;
    }

    public static <T> CommonReturnType<T> create(T result){
        return CommonReturnType.create(CommonReturnType.STATUS_SUCCESS,result);
    }
}
在controller层方法中传入返回类的data类型:
1
2
3
4
5
6
7
8
9
10
11
12
13
14
@Api(tags = "Hello控制类")
@RestController
public class HelloController {
    @ApiOperation("获取用户信息")
    @GetMapping(value = "/user")
    public CommonReturnType<User> getUser(){
        return CommonReturnType.create(new User("admin","123456"));
    }
    @ApiOperation("传入用户名")
    @PostMapping("/param")
    public CommonReturnType<String> hello2(@ApiParam("用户名") String username){
        return CommonReturnType.create("hello" + username);
    }
}
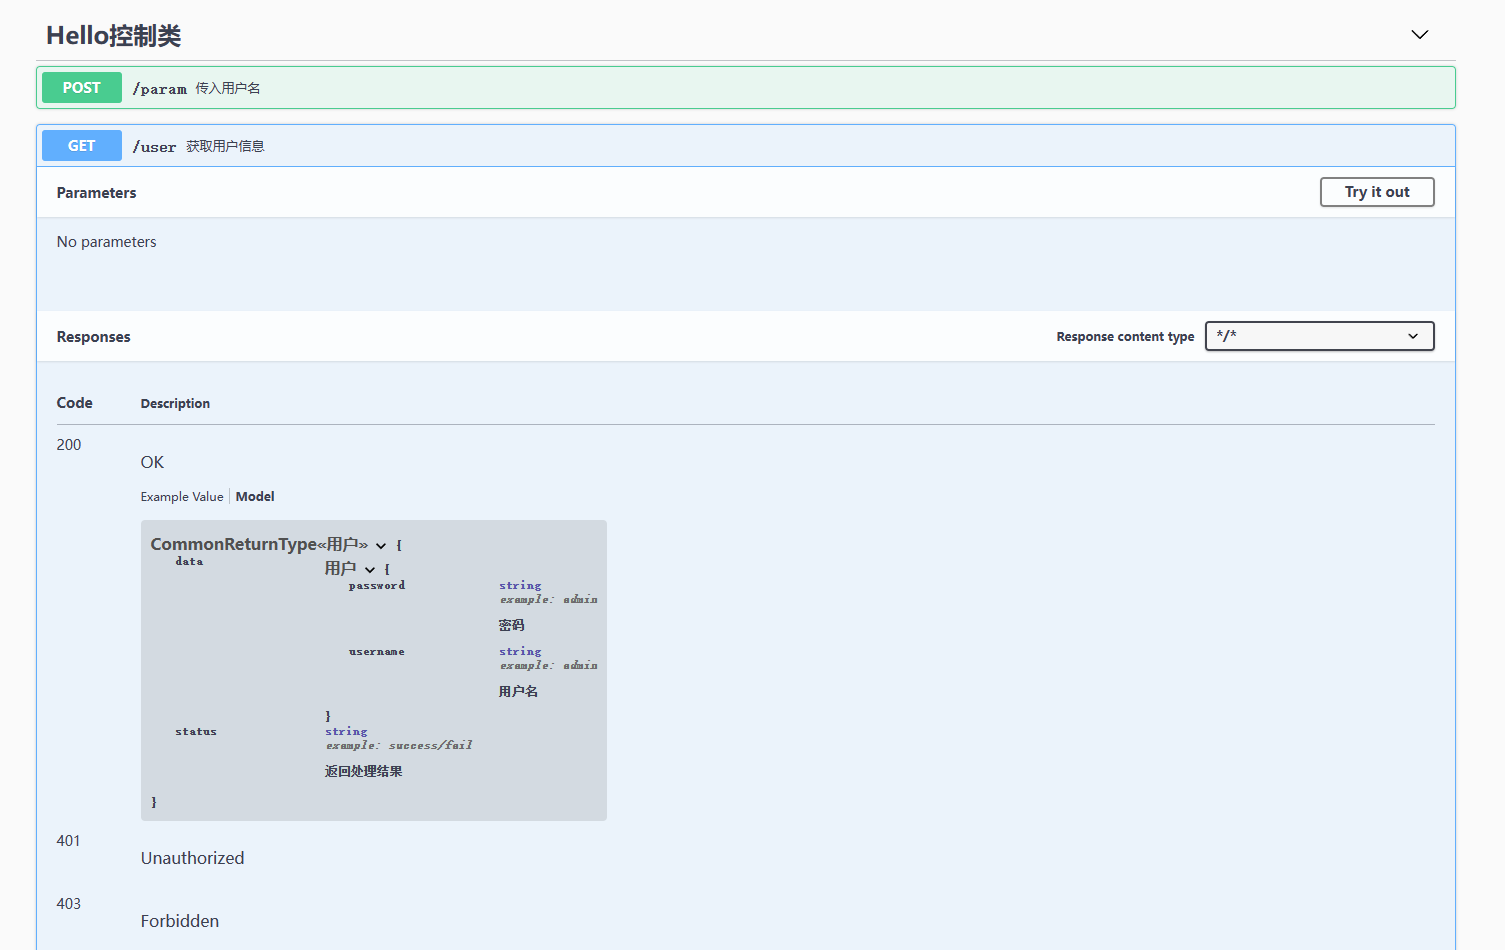
这样Swagger生成的接口文档就能显示统一返回类型中data属性的具体对象了:
多模块接口文档的配置
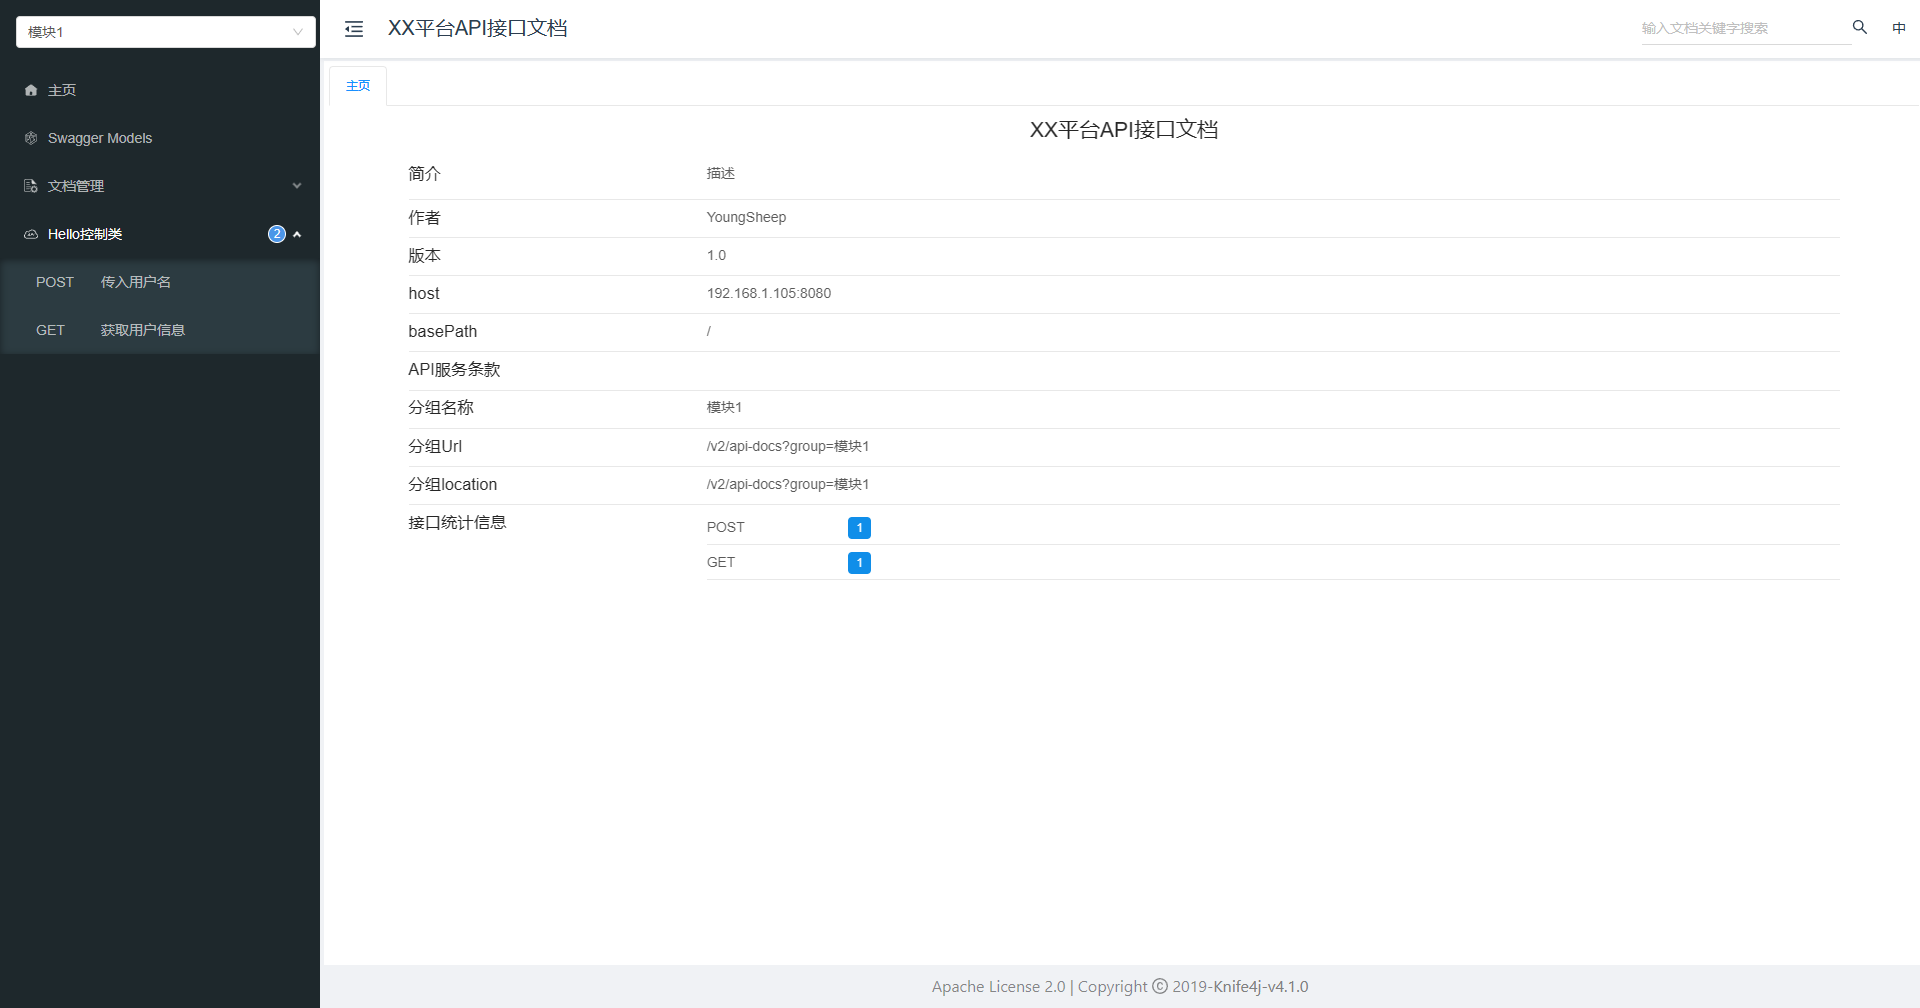
实际项目中可能会有多个模块,每个模块都会有自己的Controller层,此时我们就需要在swagger配置类中配置多个Docket,并给每个Docket一个组名,这样就能实现生成多模块的接口文档。
1
2
3
4
5
6
7
8
9
10
11
12
13
14
15
16
17
18
19
20
21
22
23
24
25
26
27
28
29
30
31
32
33
34
35
36
37
38
39
40
41
42
@EnableSwagger2
@Configuration
public class Swagger2Config {
    @Bean
    public Docket createRestApi1() {
        return new Docket(DocumentationType.SWAGGER_2)
			 //模块组名
			 .groupName("模块1")
             .apiInfo(apiInfo())
             .select()
             //为当前包路径,第一个模块的控制器类包
             .apis(RequestHandlerSelectors.basePackage("com.xxx.xxx.controller"))
            .paths(PathSelectors.any())
             .build();
    }
	@Bean
    public Docket createRestApi2() {
        return new Docket(DocumentationType.SWAGGER_2)
			 //模块组名
			 .groupName("模块2")
             .apiInfo(apiInfo())
             .select()
             //为当前包路径,第二个模块的控制器类包
             .apis(RequestHandlerSelectors.basePackage("com.xxx.xxx.controller"))
            .paths(PathSelectors.any())
             .build();
    }
    //构建 api文档的详细信息函数
    private ApiInfo apiInfo() {
        return new ApiInfoBuilder()
            //页面标题
           .title("XX平台API接口文档")
            //创建人
           .contact(new Contact("YoungSheep", "https://youngsheep.fun",
                 "568462483@qq.com"))
           //版本号
          .version("1.0")
           //描述
          .description("描述")
          .build();
    }
}
这样就能生成模块1、模块2两个分组的接口文档。
Knife4j
由于Swagger生成的接口文档ui着实有点简陋了,查阅资料发现Knife4j这个插件,它之前的名字叫做swagger-bootstrap-ui,很显然就是一个重构swagger的ui的插件,后来直接改名叫Knife4j。它的界面还是很人性化的,且支持在线调试以及自动根据接口信息生成前端代码,简直太人性化了。
引入依赖
1
2
3
4
5
<dependency>
	<groupId>com.github.xiaoymin</groupId>
	<artifactId>knife4j-openapi2-spring-boot-starter</artifactId>
	<version>4.1.0</version>
</dependency>
由于Knife4j底层依赖就是springfox,因此不用再引入之前的swagger依赖了。
配置类
这和Swagger2的配置类没有太大区别。主要需要注意:
- 由于没有引入springfox-swagger2,因此不能使用@EnableSwagger2注解了,转而使用@EnableSwagger2WebMvc注解。
- Knife4j除了Swagger原有的那些界面设置外,还提供的增强功能,为了使用其增强功能,需要在项目配置文件中配置knife4j.enable=true,然后在配置类中配置插件体系。
1
2
3
4
5
6
7
8
9
10
11
12
13
14
15
16
17
18
19
20
21
22
23
24
25
26
27
28
29
30
31
32
33
34
35
36
37
38
39
40
41
42
43
44
45
46
47
48
49
50
51
@EnableSwagger2
@AllArgsConstructor
@Configuration
public class Swagger2Config {

  /*引入Knife4j提供的扩展类*/
  private final OpenApiExtensionResolver openApiExtensionResolver;

  @Bean
  public Docket createRestApi1() {
      return new Docket(DocumentationType.SWAGGER_2)
           //模块组名
           .groupName("模块1")
           .apiInfo(apiInfo())
           .select()
           //为当前包路径,第一个模块的控制器类包
           .apis(RequestHandlerSelectors.basePackage("com.xxx.xxx.controller"))
          .paths(PathSelectors.any())
           .build()
           //赋予插件体系
           .extensions(openApiExtensionResolver.buildExtensions("模块1"));
  }
  @Bean
  public Docket createRestApi2() {
      return new Docket(DocumentationType.SWAGGER_2)
           //模块组名
           .groupName("模块2")
           .apiInfo(apiInfo())
           .select()
           //为当前包路径,第二个模块的控制器类包
           .apis(RequestHandlerSelectors.basePackage("com.xxx.xxx.controller"))
          .paths(PathSelectors.any())
           .build()
           //赋予插件体系
           .extensions(openApiExtensionResolver.buildExtensions("模块2"));
  }
  //构建 api文档的详细信息函数
  private ApiInfo apiInfo() {
      return new ApiInfoBuilder()
          //页面标题
         .title("XX平台API接口文档")
          //创建人
         .contact(new Contact("YoungSheep", "https://youngsheep.fun",
               "568462483@qq.com"))
         //版本号
        .version("1.0")
         //描述
        .description("描述")
        .build();
  }
}
和Swagger2一样,也需要配置路径映射,不然也访问不到接口文档页面。
1
2
3
4
5
6
7
8
9
10
11
12
@Configuration
public class WebMvcConfig extends WebMvcConfigurerAdapter {
  @Override
  public void addResourceHandlers(ResourceHandlerRegistry registry) {

      registry.addResourceHandler("doc.html")
              .addResourceLocations("classpath:/META-INF/resources/");

      registry.addResourceHandler("/webjars/**")
          .addResourceLocations("classpath:/META-INF/resources/webjars/");
  }
}
这样访问http://localhost:项目port/doc.html 就能访问接口文档了。注解配置接口文档的方式依然是和Swagger2一样。 十分优美的UI:
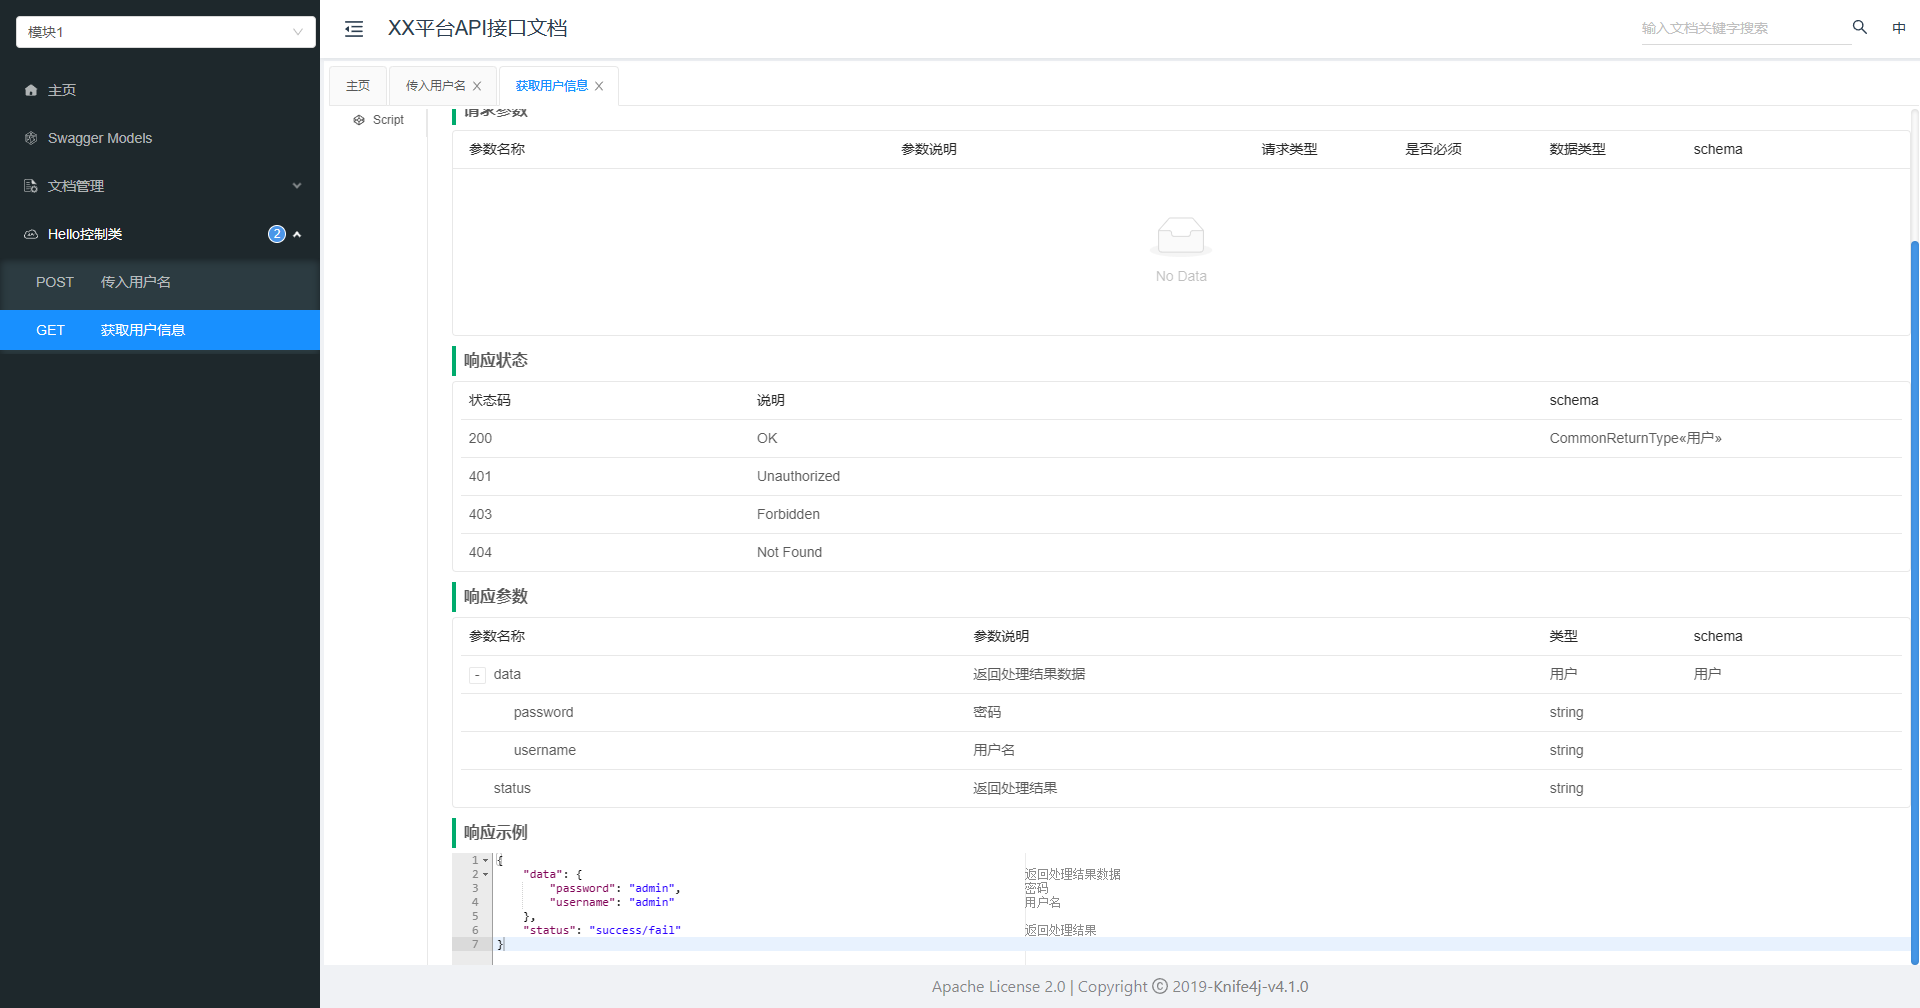
 接口信息页面的数据显示也十分直观:
 还支持在线调试:
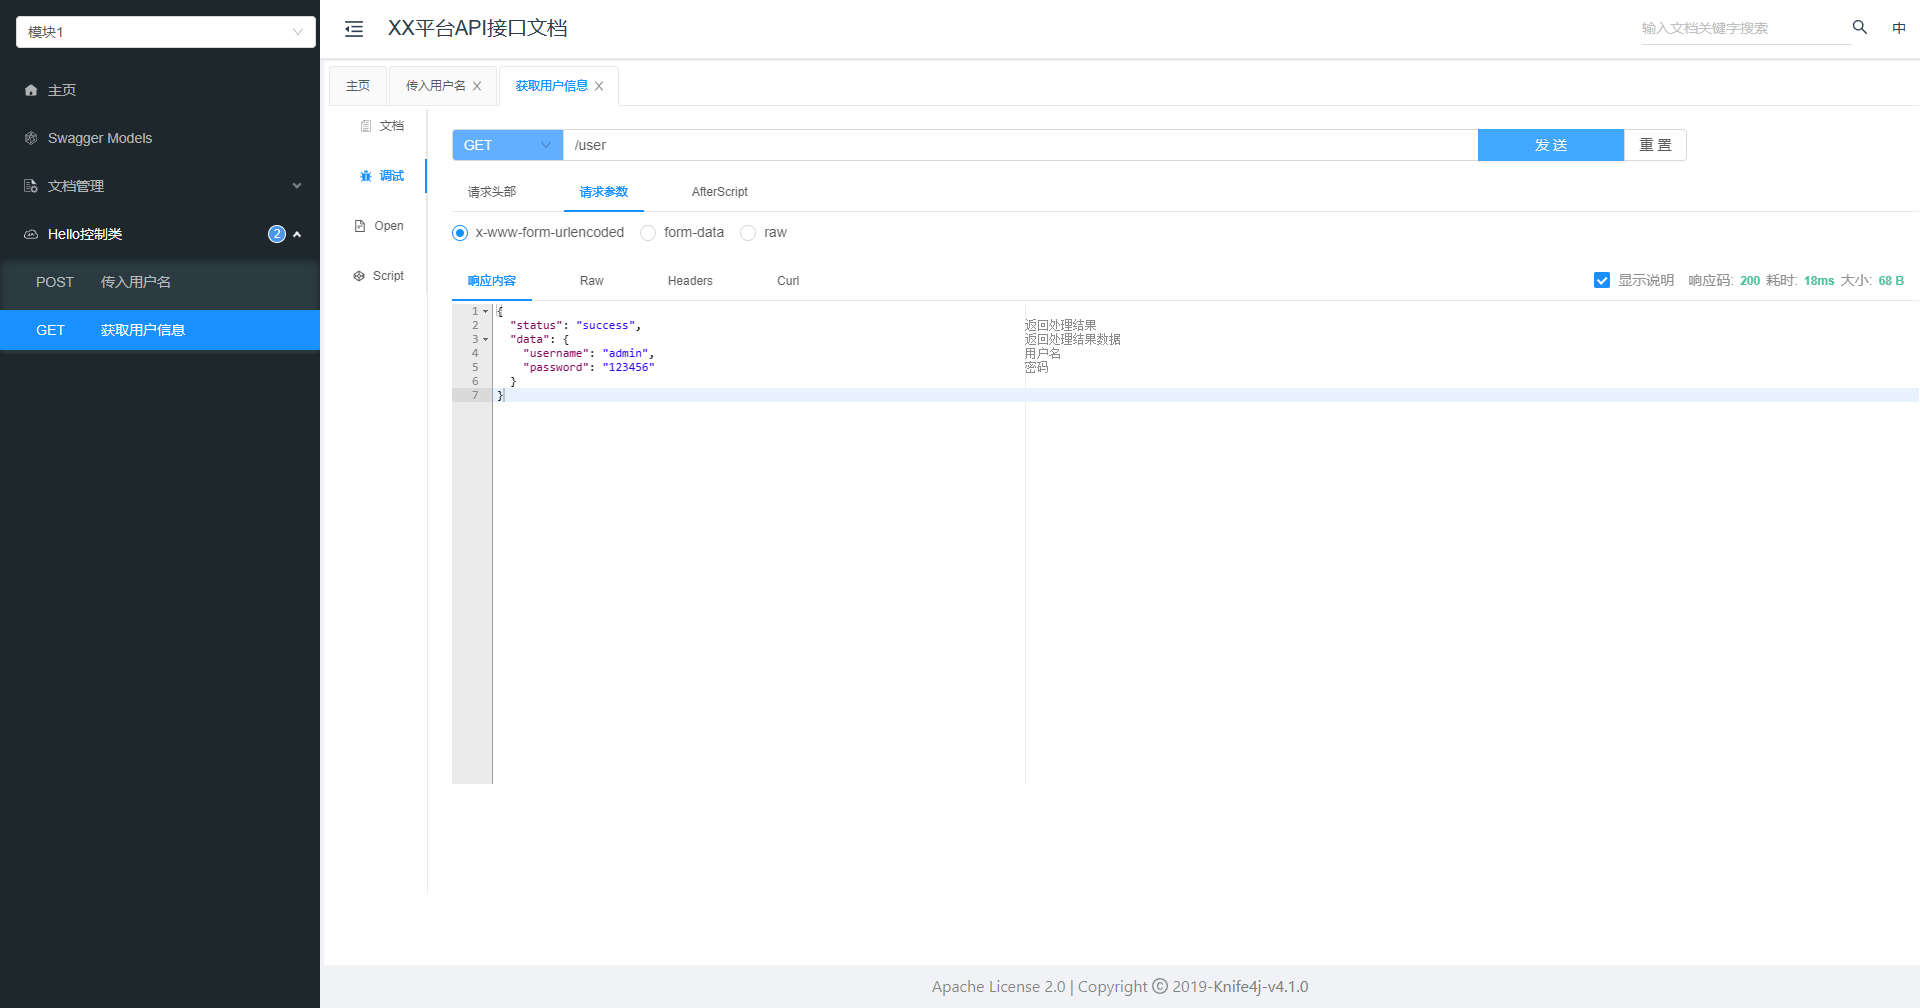 此外,调试还可以设置全局请求头,并支持设置请求后的执行脚本,这样就可以实现登录接口获取token,之后放在全局请求头中实现授权认证,这也更符合实际的项目调试,考虑很周到👍。
增强模式
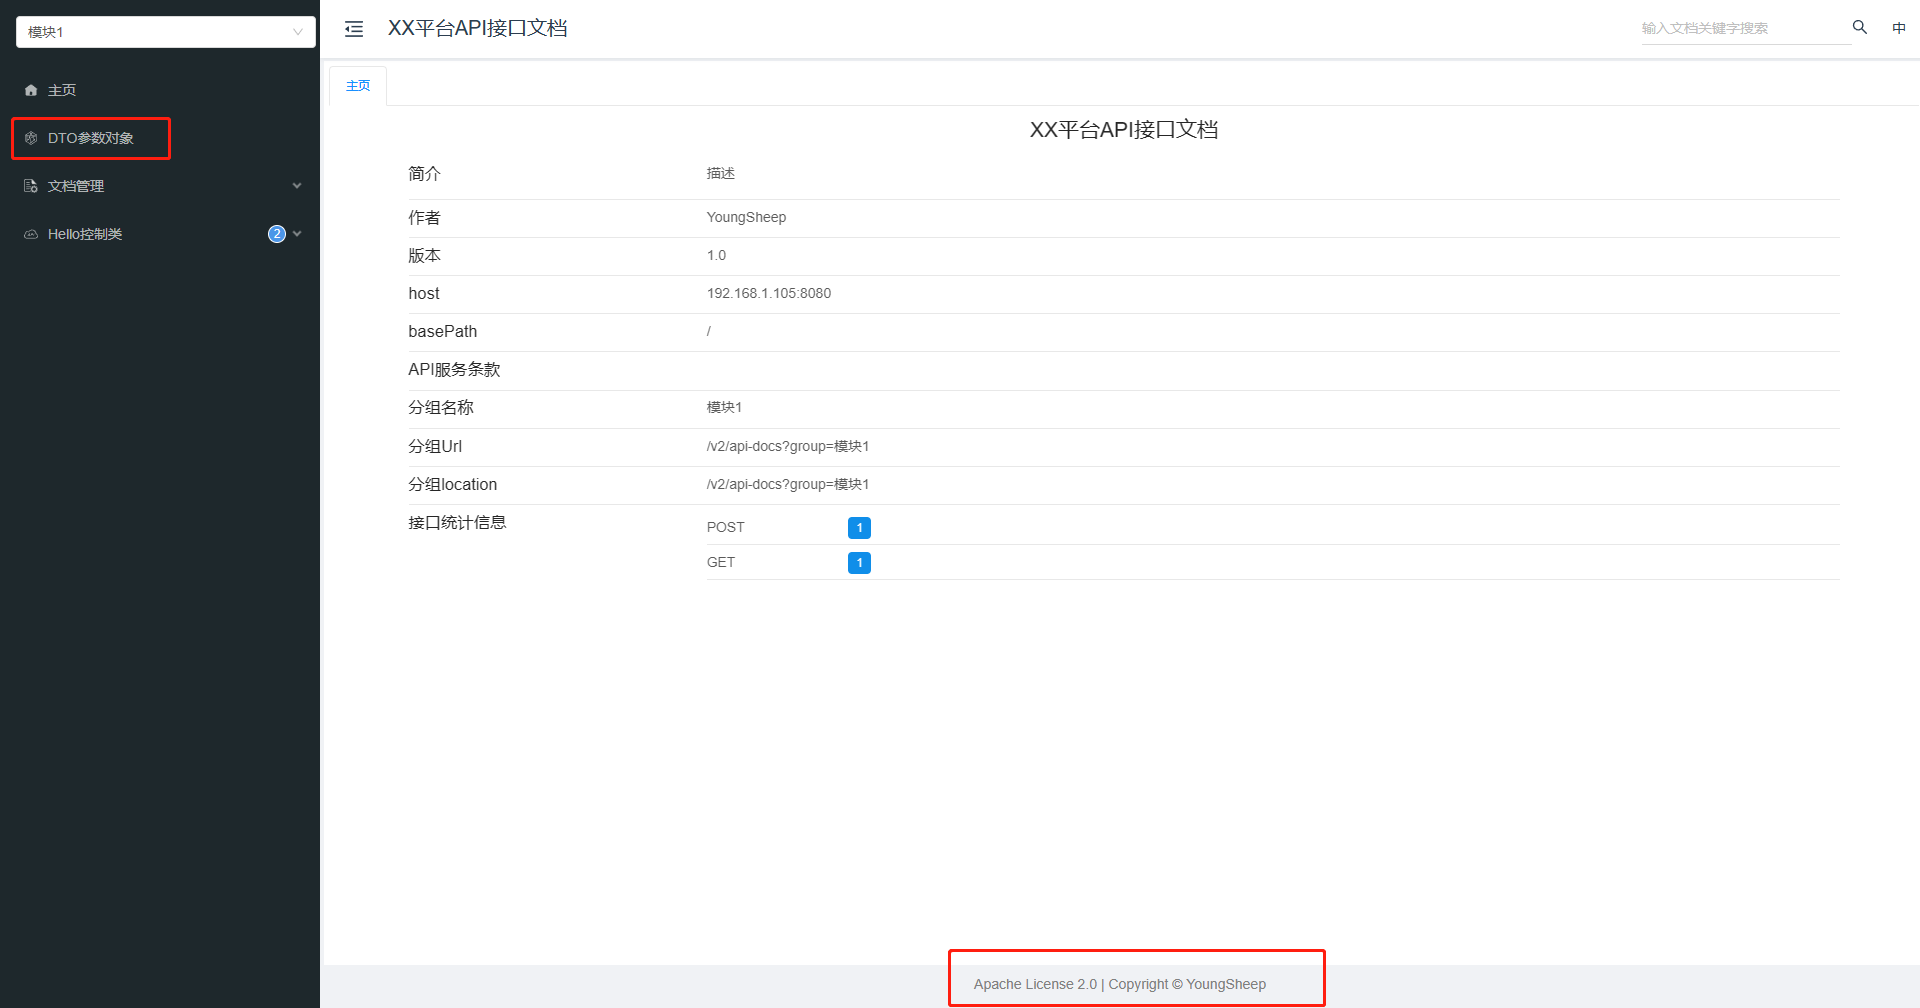
之前提到Knife4j还可以开启增强模式,可以实现如自定义Swagger Models的名称、自定义footer等。 需要在配置文件中设置:
1
2
3
4
5
6
7
8
knife4j:
  enable: true
  setting:
      enable-footer: false
      enable-footer-custom: true
      footer-custom-content: Apache License 2.0 | Copyright © YoungSheep
      enable-swagger-models: true
      swagger-model-name: DTO参数对象
并在配置类中赋予插件体系。 这样就可以自定义接口文档的一些信息:
 更多的增强功能可以查看官方文档。